Optics Mag is reader-supported. When you buy via links on our site, we may earn an affiliate commission at no cost to you. Read more.
What Is Aperture? Photography Basics Explained
Last Updated on
While advanced digital cameras have opened up the world of photography to everyone, they’ve also installed a steep ceiling for amateur photographers who don’t learn the basics.
The basics start with aperture, knowing what it is and how to use it. Here, we break down everything that you need to know about aperture, including what it is and how to use it in your pictures!
What Does Aperture Do?
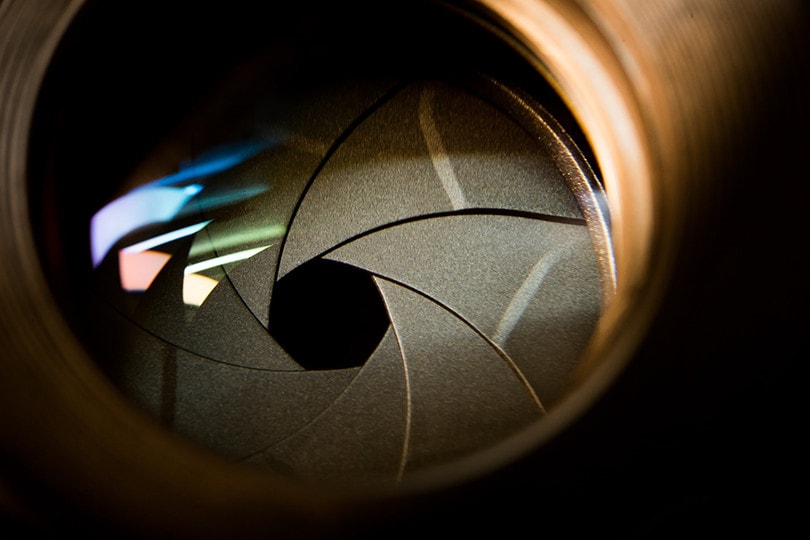
Aperture in photography is the opening of the lens diaphragm that light passes through. This is a moving component in your camera, but it’s not something that you’ll see unless you look directly into the lens.
Aperture is a crucial part of photography, and while you might think that more light is better, that isn’t always the case.
With photography, you need the right amount of light, and aperture combined with shutter speed enables you to control that amount for each photograph. Aperture also enables you to control what’s in focus in your photograph, otherwise known as the depth of field.
Essentially, aperture lets you control how much light passes through the lens compared to the length of exposure. Too much light and you’ll flood out the photo, but it also won’t look right if you don’t get enough light.
Image by: insung yoon, Unsplash
What Are the Different Types of Apertures?
There are many photo aperture options, but they all fall on the same scale, so the benefits and drawbacks of each one are progressive. If you’re adjusting the aperture yourself, you can find the happy medium to get the photograph that you want — if you know what it all does.
Large apertures, represented with a small f/stop, translate to a shallow depth of field, blurring the background for you. Small apertures, which have a large f/stop, do the opposite, putting more of the photo in focus.
However, since the photo needs light, small apertures slow down the shutter speed, making it difficult to capture moving objects. But for landscape shots and other photographs without moving components, a small aperture enables you to get more in focus.
Of course, sometimes you want a shallow depth of field to put the object of the photo on display without any distractions from the background. It’s a stylistic choice, and it all depends on the specific photo that you’re taking.
Controlling the aperture enables you to control the depth of field, and the more control that you have as the photographer, the better!
Where Is It Used?
You use aperture in every photo that you’ve ever taken whether you’ve realized it or not. Many amateur photographers use the automatic setting on their camera. With this, your camera analyzes the amount of light around and sets the aperture for you.
For many photographers, this is all that they ever need, and there’s no reason to dive in any further. However, if you’re looking for more control and want to set up a specific shot, you can manually adjust the aperture on most cameras.
This enables you to fine-tune your images to exactly what you want instead of what a preset computer program says is best. But even if you don’t manually control the aperture, you’re still using it!
Image by: Wan San Yip, Unsplash
Advantages of Large Apertures
Large apertures let in more light, and in certain situations, that can have a few advantages. First, it gives you a shallow depth of field, which lets you blur out backgrounds. This is a popular choice for portraits. It also allows for a faster shutter speed, which enables you to capture moving objects with less blur.
Disadvantages of Large Apertures
While there are clear advantages of using a large aperture, there are a few drawbacks too. First, you have to use a fast shutter speed, which can affect the overall crispness and quality of the photo.
Second, it does give you a shallow depth of field, so if you’re looking for more background details, you need a smaller aperture. Finally, if you’re in a situation with plenty of light, a large aperture can make these problems even worse because the shutter speed needs to be that much faster.
Frequently Asked Questions
When you’re diving into the nitty-gritty details of photography, things can get confusing fast. Here are the answers to frequently asked questions.
What Is the Exposure Triangle?
When you’re looking at photography basics, one of the first lessons is about the exposure triangle. It’s a triangle with three settings taking up the length of each side segment: ISO, aperture, and shutter speed. All these things work in tandem, and if you change one, you need to change another. It’s all about getting the right amount of light for a high-quality photo.
Mastering the exposure triangle is key to capturing high-quality photos.
Image by: ShareGrid, Unsplash
Is ISO the Same as Shutter Speed?
While they work together, ISO and shutter speed are two completely different things. Shutter speed refers to the actual speed that the lens opens and closes, exposing light to the sensor.
ISO refers to the sensitivity of the sensor to light. With film cameras, it is a set number for the film, but with digital cameras, you can adjust the ISO.
The more sensitive the ISO is, the less light it needs to capture a photo, which affects how fast the shutter speed needs to be!
How Does Aperture Affect Shutter Speed?
Aperture has a distinct effect on shutter speed. The larger the aperture, the faster you need the shutter speed to be, so it doesn’t flood the image with too much light.
If you have a small aperture, you need a slow shutter speed so enough light can go in to get the image you want.
A Quick Reference Guide
When to Use a Large Aperture
When to Use a Small Aperture
Portraits
Landscape photos
When you want a shallow depth of field
When you want a large depth of field
For moving objects
For still or slow-moving objects
Conclusion
Now that you know what aperture is and how to use it, it’s time to practice! Dive into your camera’s settings and start taking pictures. It’s the only way to really understand how it’s going to affect your photos, and with digital photography, you can practice as much as you want without it costing you a dime!
The more you practice, the better you’ll get, and the more that you’ll be able to adjust the settings and get the exact picture that you want!
Robert’s obsession with all things optical started early in life, when his optician father would bring home prototypes for Robert to play with. Nowadays, Robert is dedicated to helping others find the right optics for their needs. His hobbies include astronomy, astrophysics, and model building. Originally from Newark, NJ, he resides in Santa Fe, New Mexico, where the nighttime skies are filled with glittering stars.