
Optics Mag is reader-supported. When you buy via links on our site, we may earn an affiliate commission at no cost to you. Read more.
4 Ways to Take Photos Through a Microscope
Last Updated on

Humans are creatures that prefer to record our findings and experiences so we can examine them later on. Nowhere is this more prevalent than the scientific field, where recording your experiences and observations is considered part and parcel for the project.
For the hobbyist who has just started learning how to use a microscope, documenting your findings can be fun and rewarding, though getting started might seem daunting at first. What equipment do you need? Is it difficult? These sorts of questions are common and sensible. But the truth is, microscope photography is very accessible today and you probably have most of what you need to do it already.

4 Ways to Take Photos Through a Microscope
When it comes to microscope photography, you have several options. If you already have some equipment, you’ll probably want to pick an option that utilizes what you have already. On the other hand, if you don’t have a microscope yet, you might decide to get one that’s specifically built for taking photos and videos.
1. Use a Digital Microscope
https://www.instagram.com/p/B22Frtvln8U/
This is probably the easiest way for you to get started with microscope photography. Digital microscopes are accessible, affordable, and relatively new. Most are USB powered, which means you just plug it into your computer, and it works.
To keep costs down, digital microscopes don’t have eyepieces for you to look through. Instead, the image will appear on your computer screen, which is much larger than what you’d see through a small eyepiece anyway. Naturally, viewing the image on your computer makes it easy to record and capture both photos and videos.
Don’t have a computer? Digital microscopes are still accessible to you. Most can even be used with a smartphone app, allowing you to view and capture your microscopy right from your phone.
These devices are also filled with great features, such as built-in LED lights to illuminate your specimen. Some claim to offer incredible amounts of magnification, though realistically, they’ll generally top out around 200x usable magnification; still plenty for most hobbyists and enthusiasts.
2. Use an Adapter
If you want to take pictures through a microscope but already own a microscope, one of the easiest ways to add this functionality is to purchase a microscope lens adapter. These are inexpensive devices that allow you to attach your smartphone to your microscope’s eyepiece. Then, you can use your phone’s camera to take pictures and videos of what you see by looking through the microscope.
This option is best if you have a high-end smartphone, like an iPhone or Galaxy with a good camera. These phones often have specific lenses and settings for macro photography, which you’ll want to switch to to get the best clarity and focus on your images.
But there are also adapters for those who are more serious about photography. These will allow you to attach a much larger camera to your microscope, such as a DSLR or mirrorless, enabling you to take even higher-quality pictures. This requires you to either have a high-end camera or be willing to purchase one. Most people already have a smartphone on-hand though, making that the more accessible option.
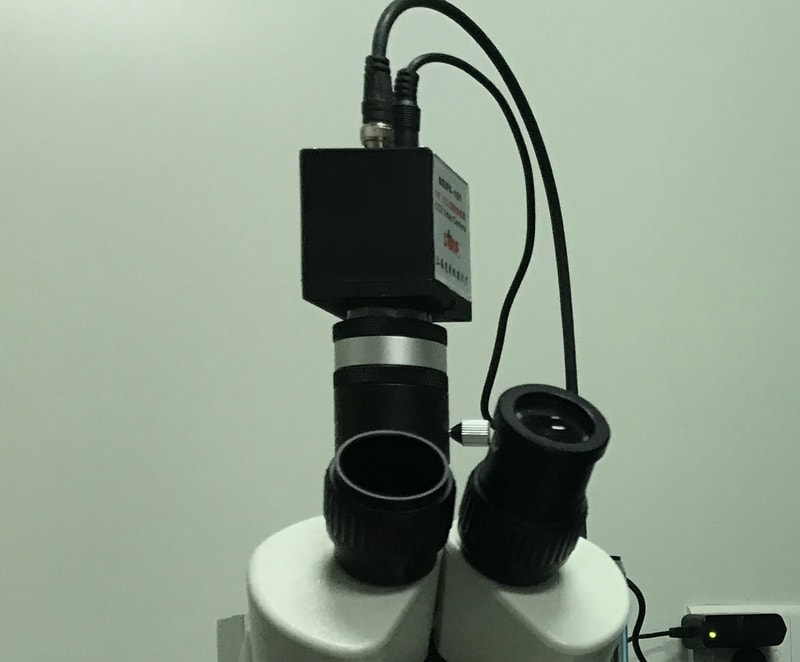
3. Use a Microscope Camera
![]()
No doubt, this is the most expensive way to take photos through a microscope on our list. To use this method, you’ll need both a microscope and a microscope camera. Microscope cameras can be pretty pricey, but they’re purpose-built for this job. If you take your microscope photography very seriously, then this might be the best choice for you.
Microscope cameras are very small; built just for taking close-up photos through microscopes. As such, they come with adapters that allow you to easily attach them to various eyepieces. They are powered by USB, which will plug into your computer. This makes it dead-simple to take pictures and videos.
Thanks to the small size of these cameras, you won’t need an additional tripod to mount them. You also won’t have to hold them since they attach directly to your microscope’s eyepiece. The only real downside to this method is the price because microscope cameras can cost several hundred dollars.
4. Use a Tripod and Macro Mode

While microscope cameras are the best bet for taking pictures through a microscope, they’re far from the only bet. You could do this in a much lower-tech way without having to spend any money. Just use whatever you’ve already got at your disposal.
If you have a decent digital camera, even one that’s a few years old, you should be able to use it for microscope photography. Just look through the settings and see if you can find a macro mode, which will enable you to take photos of very close objects. A smartphone is also a perfectly acceptable alternative if you prefer, or if you don’t have a digital camera.
Now, you have two options in this method. You can hold the camera by hand and take pictures with the lens of your camera pressed to the eyepiece of the microscope. While this can work, it takes a very steady hand and many pictures won’t come out as you hope.
The other option is to mount your camera on a tripod. Many people already have tripods available, making this an affordable option. Once your phone is mounted on a tripod, your shaky hands will be taken out of the equation, making it much easier to get a clear and focused picture. However, it can be difficult getting the tripod to hold your camera at the right angle, so it might take some experimentation and patience.

In Conclusion
Today, the bar for entry into the world of microscope photography is lower than ever. All it takes is a microscope and a smartphone and you can start documenting your observations and findings. We’ve outlined four easy ways you can get started with photographing your microscopy today. Hopefully, one of these methods has resonated with you and you’re ready to get started. We look forward to seeing what you come up with!
Featured Image Credit: Vector8DIY, Pixabay
About the Author Dean Eby
An avid outdoorsman, Dean spends much of his time adventuring through the diverse terrain of the southwest United States with his closest companion, his dog, Gohan. He gains experience on a full-time journey of exploration. For Dean, few passions lie closer to his heart than learning. An apt researcher and reader, he loves to investigate interesting topics such as history, economics, relationships, pets, politics, and more.
Related Articles:
How to Clean a Refractor Telescope: Step-by-Step Guide
How to Clean a Telescope Eyepiece: Step-by-Step Guide
How to Clean a Rifle Scope: 8 Expert Tips
Monocular vs Telescope: Differences Explained (With Pictures)
What Is a Monocular Used For? 8 Common Functions
How to Clean a Telescope Mirror: 8 Expert Tips
Brightfield vs Phase Contrast Microscopy: The Differences Explained
SkyCamHD Drone Review: Pros, Cons, FAQ, & Verdict