
Optics Mag is reader-supported. When you buy via links on our site, we may earn an affiliate commission at no cost to you. Read more.
What Is Reverse Lens Macro Photography?
Last Updated on

You have a few different options at your disposal if you are trying to get pictures that make the subject appear larger than they are in real life. One unique way to get the job done is reverse lens macro photography.
But what exactly is reverse lens macro photography, how do you do it, and how effective is it? Here, we break it all down for you, as it might be the perfect solution to get you into macro photography without blowing your budget.

How Does It Work?
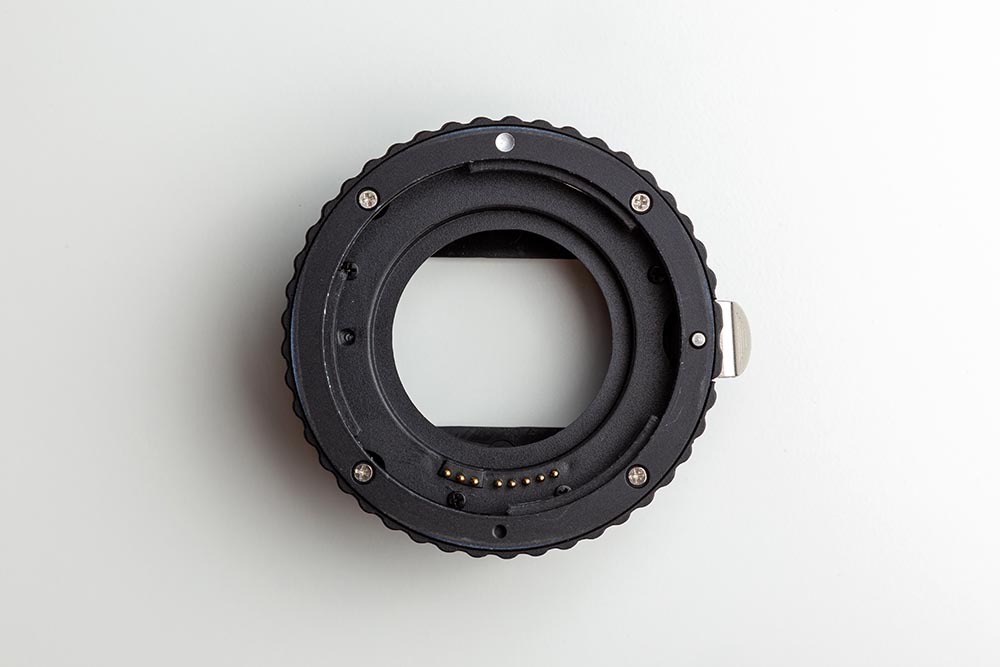
Reverse lens macro photography is a simple enough concept, and you can’t argue with the results. If you have a camera with interchangeable lenses, you’re just an adapter away from being able to do this type of photography yourself.
All you have to do is take your existing camera lens, put an adapter on the front, and then put it back on your camera but backward.
It’s the same concept as looking through binoculars the wrong way. When you look at binoculars the right way, it makes objects appear larger, and when you flip them around, those objects look smaller.
By flipping the lens around on the camera, it projects a much larger version of the sensor on the camera, which means it only captures a much smaller portion of it. The result for you is an extremely magnified image when you’re taking pictures.
What Are the Different Types of Reverse Lens Macro Photography?
While there’s only one real “type” of reverse lens macro photography, there are a couple of different ways to get the job done.
The most common way is with manual camera settings. If you’re expecting your automatic camera settings to work after turning the lens around, you’re out of luck. Your camera’s automatic settings work off preset numbers that work directly with the typical setup of a camera lens.
When you turn the lens around, it no longer communicates the way that it should with the camera body. You’ll still be able to take pictures, but you’ll need to select the camera settings that you want for each picture.
However, another option is to purchase another adapter. It depends on your camera, but some manufacturers produce adapters that reinstate the automatic features that typically come with the camera.
But while the attachment adapter to get you started in reverse lens macro photography is typically affordable, the adapter that reinstates the automatic features typically costs more.
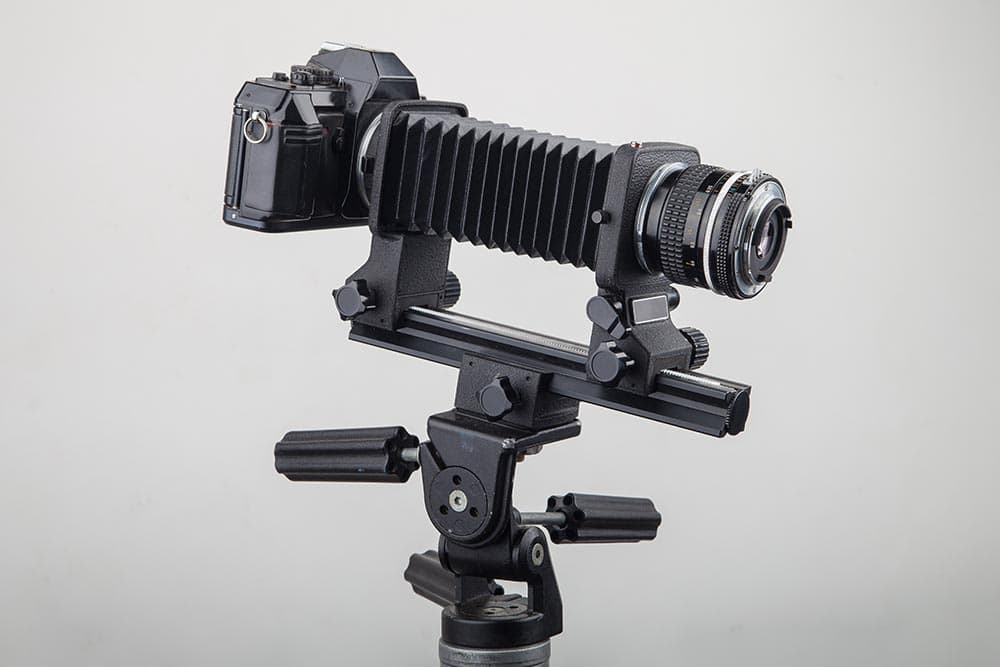
Yet another option that you have for reverse lens macro photography is a twin-lens setup. It’s not as common or as popular as the single-lens setup, but it’ll work just the same and even has a few extra benefits.
You start by hooking up the first lens to the camera normally, just like you would if you were taking regular photographs. Then, install a coupler attachment on the front, and hook up the second lens backward onto the first.
The advantage of using two lenses is that you can get much closer magnification than you could with just one lens. It’s possible to get 3x life-size pictures! You also get more flexibility with the depth of field in the photo.
It’ll take practice and time for you to master all the features, but if you opt for a twin-lens reverse lens macro photography setup, you’ll have more capabilities in the long run.

Where Is It Used?
You can use reverse lens macro photography whenever you want to dive into macro photography. While you can purchase a macro-specific lens for this type of photography, the advantage of reverse lens macro photography is that all you need is an adapter, and all your existing lenses turn into macro lenses!
However, while it’s a fun way to unlock a whole new world of photography, it does come with a few limitations, which is why reverse lens macro photography is typically the realm of hobbyists and amateurs. Still, if you can master the manual settings, there’s no reason that you can’t take top-notch reverse lens macro photography images.
Advantages of Reverse Lens Macro Photography
The advantage of reverse lens macro photography is that you can take macro images at a fraction of the cost of a dedicated macro lens. Even better, if you already have multiple lenses for your DSLR or mirrorless camera, one adapter technically gives you multiple macro lenses.
It’s easy and affordable to get started with — and you’ll probably turn a few heads when they see your camera with the lens on backward!
Disadvantages of Reverse Lens Macro Photography
While reverse lens macro photography is a cool way to take pictures, there are a few drawbacks compared to a dedicated macro lens.
The most notable disadvantage is the fact that you don’t get automatic settings like ISO, aperture, shutter speed, and focus adjustments. With reverse lens macro photography, you need to make all these adjustments manually.
But even if you master all the manual adjustments, another drawback is that a reverse lens macro photography setup simply isn’t as versatile as a dedicated lens. You have a much smaller range to work with compared to a dedicated and more expensive macro lens.
Frequently Asked Questions (FAQs)
When you’re looking to get started in reverse lens macro photography, check out these answers to frequently asked questions.
What Kind of Lens Do You Want for Reverse Lens Macro Photography?
While you can use any lens that you want in reverse lens macro photography, the whole reason that you’re doing it is to make images larger. To get the largest possible images with reverse lens macro photography, you want a lens with a focal length between 28mm and 50mm.
With a 50mm reverse lens macro photography setup when you’re 5 centimeters away from the subject, you get a 1:1 ratio picture. With a 28mm lens, you get a 3:1 ratio from 7.5 centimeters away.
What Is an Extension Tube?
An extension tube is a tool that you have at your disposal to increase the magnification of your camera. It does this by enabling you to get closer to the subject without losing focus.
It’s not something that you need to use with a reverse lens macro photography setup, but if you’re trying to keep the lens on the right way, it’s an option that you have at your disposal.
How Do You Get Enough Light for Reverse Lens Macro Photography?
One of the most notable problems that you’ll encounter with reverse lens macro photography is getting enough light to produce a clear image. You have two different ways to work around this problem.
First, you can use a tripod to keep your camera steady for longer exposures, thus increasing the amount of light that reaches the sensor. The second option is to turn on the flash for your camera. Simply adding more light to the scene is a great way to increase the amount of light that reaches the sensor.

Conclusion
With how affordable it is to get into reverse lens macro photography, there’s no reason that you can’t pick up an adapter and try it for yourself. It’s a fun way to get into macro photography and an even better way to learn about the basics of lenses, cameras, and photography.
So, get out there, get an adapter, and start taking reverse lens macro photography pictures!
Featured Image Credit By: Saad Siddique, Shutterstock
About the Author Robert Sparks
Robert’s obsession with all things optical started early in life, when his optician father would bring home prototypes for Robert to play with. Nowadays, Robert is dedicated to helping others find the right optics for their needs. His hobbies include astronomy, astrophysics, and model building. Originally from Newark, NJ, he resides in Santa Fe, New Mexico, where the nighttime skies are filled with glittering stars.
Related Articles:
What Is the Best Binocular Magnification for Hunting? Optical Features Explained
How to Clean a Refractor Telescope: Step-by-Step Guide
How to Clean a Telescope Eyepiece: Step-by-Step Guide
How to Clean a Rifle Scope: 8 Expert Tips
Monocular vs Telescope: Differences Explained (With Pictures)
What Is a Monocular Used For? 8 Common Functions
How to Clean a Telescope Mirror: 8 Expert Tips
Brightfield vs Phase Contrast Microscopy: The Differences Explained