
Optics Mag is reader-supported. When you buy via links on our site, we may earn an affiliate commission at no cost to you. Read more.
How to Fix Binoculars with Double Vision in 7 Easy Steps
Last Updated on

Instead, all you’ll need is a bit of patience and a comprehensive guide like this one to walk you through everything you need to know.
But before you dive in and start adjusting screws, read the next few sections breaking down a few basic precautions and things to look out for before you start making your adjustments.

Important Things to Know
Just because it’s not as hard to adjust your binoculars’ collimation as you think doesn’t mean you should start tearing your binocular apart to fix it right away.
Before you start peeling off any adhesive or twisting any adjusting screws, there are a few things you should watch out for.
First, the most common way your binoculars collimation gets screwed up is that someone is messing with it. That means once you start messing with the collimation, it’s more likely that you’ll need to adjust it again in the future.
Second, if you have a decent pair of binoculars, chances are it has a lifetime warranty for collimation adjustments. In fact, we’ve heard of some binocular companies honoring these warranties close to 35-years after the date of purchase!
Finally, many brands will automatically void your entire warranty if you attempt to adjust the collimation yourself. If you have a high-end pair of binoculars, verify the warranty before you start making adjustments.
A Quick Note About Adjusting Screws
Before you start haphazardly twisting adjusting screws, there are a few things that you should know. First, you’re adjusting prisms. That means your adjustments aren’t going to be going straight up and down – instead, they’ll be going diagonally.
This complicates everything a bit – and it’s why you need to make small adjustments and have tons of patience.
From there, you need to make small adjustments – roughly 1/8th of a turn at a time. It doesn’t matter how far off the adjustment is – take it slow. After every adjustment, take about a five-second break from the binoculars.
This is because while you’re adjusting the screws to bring everything together, your eyes are doing the same thing. Your brain is working to bring the two images together, even if they don’t line up perfectly. By taking these breaks after every adjustment, you’re giving your brain time to reset.
Finally, these are adjusting screws – not retaining screws. It might not seem like much of a difference, but if you over tighten these screws, you can detach the prisms that you’re adjusting from the inner walls of the binocular.
This isn’t as hard to do as it sounds – and it’s why it’s so important to only make minor adjustments to each screw at a time.
It’s also why it’s so important to keep track of how much you’ve adjusted each screw. If you lose track, you can’t just back the screw all the way out and start over – if you do, you’re going to need new binoculars.
The Step-By-Step Guide
If you’re ready to dive in and fix your binoculars, this is the part you’ve been waiting for – the most comprehensive step-by-step guide out there. While you’re reading and adjusting, just remember to take your time and keep your cool.
1. Gathering Materials and Tools
Before you start any job, you need to make sure that you have everything you need. While adjusting your binoculars might not seem like a monumental task, there are several tools you’ll need, or else you’re going to spend a ton of time getting nowhere.
- Small screwdriver set (extremely small – like those you would use on eyeglasses)
- Tripod and tripod adapter
Yep – that’s all you’ll need. While there are a few specific tools that might make your life a little easier depending on your particular model binocular, you don’t typically need those tools either way (it’s all about locating the adjusting screws).

2. Locate the Adjusting Screws
If you need any extra tools, it would be for this step. You have to locate your specific models adjusting screws, and sometimes they like to hide them behind adhesive strips or plastic casings.
Either way, the best way to track down the adjusting screws is in the user’s manual. But if the manual doesn’t tell you or you’ve long since lost it, you’re not entirely out of luck.
That’s because the screws are typically in similar locations; it’s just a matter of how you find them.
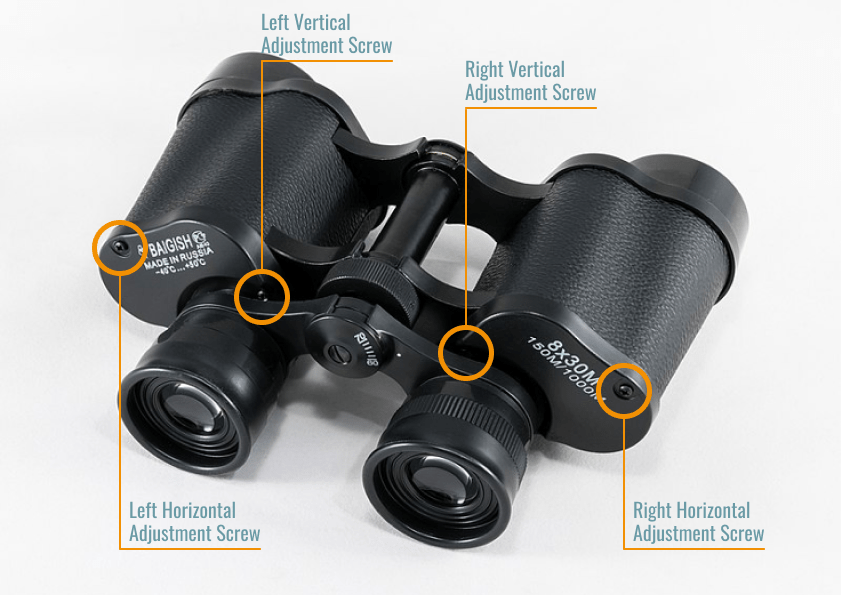
The horizontal screws are typically by the eyepieces. There might be an adhesive strip that you need to remove. If so, a razor blade can speed along the process – just be sure to keep the blade away from the lens itself.
Meanwhile, the vertical adjusting screws are typically on the side of the binoculars. Look for plastic screws holding casings on or thin strips of adhesive sitting slightly above the rest of the binoculars.
Keep in mind that while these are the typical locations for the adjusting screws, the manufacturer could have located them anywhere.
3. Find a Target
While some guides will tell you to track down a lake or building, we’ve found that the best way to do it is to wait for a clear night and use a star. The reason for this is that a star is small enough to give you an excellent precise adjustment but bright enough to let you easily track your adjustments.
When selecting your star, use the brightest one you can find – just make sure that you don’t mix it up for a planet (these move too quickly across the night sky).
Furthermore, avoid the moon or star clusters – you want a singular star that’s isolated from the rest for easier adjustments.
Set up the binoculars on the tripod and line up your target when looking through the lenses. Line it up to as close as center as possible. We know that they don’t line up and that this can complicate things – just try to get it as close as you can.

4. Defocus a Lens
This might sound like it doesn’t make much sense but trust us – it’s going to make everything a lot easier when it comes to your adjustments. Just defocus a singular lens – this way, you have a blurry star in one eyepiece and a clear one in the other.
If everything lines up, the collimation isn’t the issue, but if you’ve gone this far, chances are it’s a little out of whack. From here, we’re going to start adjusting the screws.
5. Adjust the Horizontal Screws
Always start with the horizontal screws. Make adjustments 1/8th of a turn at a time, making sure to leave plenty of time for breaks in between each adjustment. When you’re making your adjustments bring it halfway to the correct position with one screw before bringing it the rest of the way together by adjusting the other screw.
While it might be possible to align everything without adjusting both screws, the image quality will suffer as a result. That’s why it’s important to adjust each side equally. If this means adjusting each side 1/8th of a turn at a time while alternating sides, that’s alright.
Keep in mind that you won’t get the two pictures perfectly aligned while adjusting the horizontal screws. To complete the adjustments, you’ll need to adjust the vertical screws.
6. Adjust the Vertical Screws
When adjusting the vertical screws, you need to do everything the same way you did the horizontal screws. Take it 1/8th of a turn at a time and take breaks after every adjustment. These breaks don’t need to belong – five to ten seconds is plenty long enough.
Just like you only brought the images halfway together with one screw, you need to split the adjustments between each side equally.
7. Refocus Everything

Once you’ve completed your adjustments and brought the two images together, refocus the lens that you unfocused for the adjustments. At this point, everything should be good to go, and you should only have one image when you look through your binoculars!
Other Helpful Tips
If this is your first-time making collimation adjustments on your binoculars, there are a few things you need to do to make sure that you don’t destroy your binoculars.
First, take your time. If you’re expecting to get your binoculars perfectly aligned in a few minutes – reevaluate. It’s more likely that it’s going to take you an hour or two to get the job done. It’s going to be a lot of back and forth, and it’s going to test your patience.
Second, keep track of everything. How many turns have you completed on each adjustment screw? You need to keep track – that way if you’re moving the wrong way or just need to get back to where you started your know-how.
Finally, don’t start your journey with expensive binoculars. If this is a cheaper pair of binoculars that you don’t care too much about – dig in. If you couldn’t bear if anything happened to them – take it to a professional for repairs.
While we believe that you can figure it out, it’s not hard to damage your binoculars while you’re making adjustments. If they’re expensive binoculars, don’t take the risk that you’ll figure it out before you break them.

Conclusion
When you’re dealing with an older pair of binoculars, it’s not uncommon for them to need a few slight adjustments. While you can take them to a repair shop, if you’re looking to save a few bucks and are willing to learn – there’s no reason that you can’t make these adjustments yourself.
Not only can you save a little money, but you will also get a better understanding of how your binoculars work. If you’re ready for a new challenge and can’t wait to get back to stargazing or sightseeing, there’s no reason not to get your binoculars re-collimated today!
Related Read: How to Repair Binoculars at Home: Beginner’s Guide
Featured Image Credit: Atlantios, Pixabay
Table of Contents
About the Author Robert Sparks
Robert’s obsession with all things optical started early in life, when his optician father would bring home prototypes for Robert to play with. Nowadays, Robert is dedicated to helping others find the right optics for their needs. His hobbies include astronomy, astrophysics, and model building. Originally from Newark, NJ, he resides in Santa Fe, New Mexico, where the nighttime skies are filled with glittering stars.
Related Articles:
How to Collimate Binoculars: 9 Expert Tips
Can You Use Binoculars to Look At Stars? How to Choose the Right Pair
How to Choose Binoculars for Bird Watching: 10 Expert Tips
How to Clean a Refractor Telescope: Step-by-Step Guide
How to Clean a Telescope Eyepiece: Step-by-Step Guide
How to Clean a Rifle Scope: 8 Expert Tips
Monocular vs Telescope: Differences Explained (With Pictures)
What Is a Monocular Used For? 8 Common Functions